Item Economy Fundamentals
What is Item Economy?
Item Economy is choosing and using your components efficiently to have the strongest overall set of items. There are countless factors to consider but this guide will focus on the most important ones. I will use the Renata/Singed composition for the examples (not from the same game). In this comp, our item priority is: Best in Slot (BiS) Renata > 3 item Singed > Antiheal > Shred > secondary carry > secondary tank.
Stage 2 – accumulate key components
We are committed to Singed/Renata reroll, perhaps with a 2-1 augment like Voidcaller, Investment Strategy, No Scout No Pivot, etc. Our opening items are Chain Cloak Bow and we make Stoneplate. Because we want to reroll, we stay level 3 and lose the first two rounds to level 4 players and are first pick on carousel.
A mistake is taking Belt here and completing Nashor’s here to have one of Renata’s 3 BiS items, which are Shojin, Nashor’s, and Archangel’s. However, we are not in a rush to slam items and be strong right now, as we are likely to lose anyway to level 5 players as a level 4. The problem is we still need two Tears for Renata BiS.
We should take Tear here. Due to item bag sizes, we are more likely to be dropped diverse components instead of duplicates- at this point in the game, it is still very likely we will get our Nashor’s eventually. An added bonus here is that after Renata BiS, Tear is still a very strong component in the comp as it makes Shred with Shiv, and also makes multiple Singed items including Redemption which is BiS due to long fights and the durability increasing the value of Renata’s shield (compared to HP), so we are actually happy if we get dropped extra Tears.
Stage 3 - balance frontline and backline
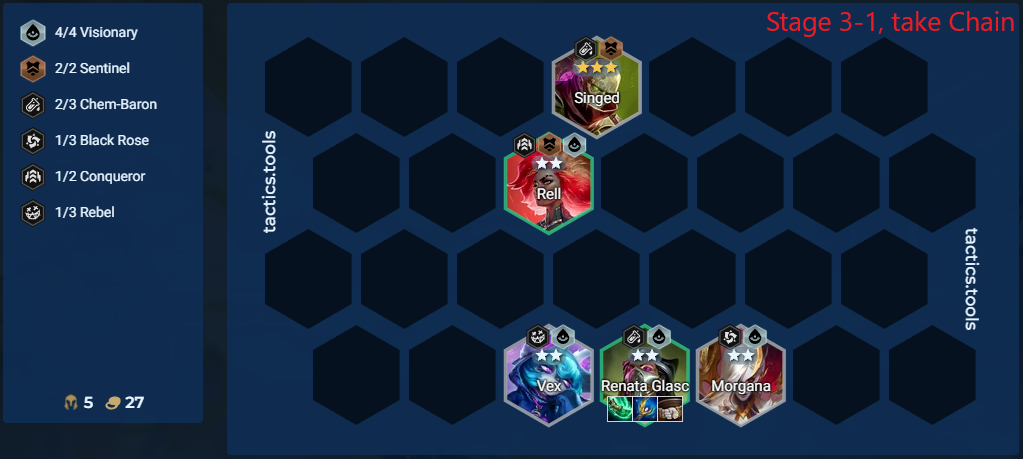
Having 3 Singed items and a “pretty good” Renata is much stronger than an incomplete Singed and BiS Renata. Note that because we are prioritizing our carousel picks for our Renata in this comp, we just hope to have 3 decent items on Singed rather than his BiS. However sometimes our item distribution will be heavily skewed one way or the other, in which case we may need to balance it out. In this scenario where we have 5/6 of our Renata components but 0/6 of Singed components, we should take a frontline component.
A common mistake I see here is taking bow to complete Nashor’s. However, it’s extremely likely that wolves on 3-7 will give us some offensive components, so we can still have a decent 3rd Renata item here with something like Jeweled Gauntlet or a second Shojin, and hopefully we can remover it later in the game for Nashor’s. Having a 3 item Singed and a decent 3 item Renata can easily be the difference in 40 HP through stage 4 compared to having a weak Singed and BiS Renata. Chain is a great choice since otherwise it can make the strongest items with Glove and Rod drops, but Tear is good as well (with Redemption being immediately buildable depending how much you need tempo). Belt is a bit worse and Cloak is much worse due to how many outs they have to make tank items, and how strong those items are.
Stage 4 - use uncontested components
There is only 1 more neutral round so we plan to not get too many more components. We can also estimate how many more components we’re likely to get, as we usually get 14-16 total without augments or encounters by 5-1. While the guaranteed anvil gives a 50/50 chance of hitting any specific component, we should avoid saving multiple components that require specific outs because it is very unlikely we will hit all of them. In this scenario with open Rod, Chain, and Cloak shown on the dummy, we need to be careful with what components we are left with when building items.
A mistake here would be making Crownguard. Even though it is a much better item than Stoneplate, doing so leaves us with a Cloak, which can only find very weak value as exactly Adaptive on Vex with 1/8 outs. Instead, if we save Rod, we keep 6/8 options open with some great ones including Deathcap, Archangel’s, Jeweled Gauntlet, and especially Morello. Meanwhile, even the weak options of Gunblade or Rageblade are comparable to Adaptive.
Stage 5 - efficiently use leftovers
Having two decent items is usually better than one great item and one dead item. There can be some exceptions, most commonly if we need shred or antiheal. When choosing an item from an anvil, it’s very important to determine what your entire item set will be.
A mistake here would be making Shojin. Even though Shojin is the strongest possible item you can make, it would leave a Hurricane as your leftover item which provides no value. Instead, we still take Sword but making two decent items with Adaptive and Giant Slayer is much stronger.
Closing thoughts
As always, these are general concepts to improve how you think about TFT rather than hard rules to always follow- every situation in TFT is different. I organized the guide by the stages they are most relevant on, but most of these concepts apply to other stages. Especially stage 3, which is very much a middle ground between stage 2 and stage 4 and all of these factors should be considered.
In addition, different comps may be more item agnostic. In the Renata example, I recommended taking Tear on Stage 2 and not building an item. However, if you have Academy Crest and you are 100 HP going into Stage 2 carousel, you should prioritize building an item immediately that is strongest on your current board in order to winstreak into Krugs, which gives a huge economic advantage. This is because the Academy line can use a mixture of AD, AP, and tank items with multiple itemized carries from the trait. The units themselves are also less sensitive about their BiS than Renata, whose shield doesn’t scale with crit or damage amp.
Thanks for reading and let me know if you have any comments or questions in the Discord!


